I have a special request from a regular viewer! He has asked me about my food dehydrator!
A Few Years Ago
My daughter asked for a food dehydrator for a gift several years ago. I don’t think she really thought I would get it for her, because of the cost, but I did. She is very involved in the Boy Scouts (my grandson is a Scout) and loves camping. In addition, she lives in an area of the U.S. where just about everyone hunts. She wanted to be able to make jerky, and to dehydrate foods for camping. I think she has used it to make fruit leather more than for any other purpose.
A Year Ago
We decided to participate in Bountiful Baskets because we wanted to eat healthier. At first, I was kind of overwhelmed by the amount of fruit and vegetables we got each week. I wasn’t used to having that much on hand. And I wasn’t very efficient at processing our weekly harvest. But as I got going, and my freezer started overflowing with cleaned and prepared frozen fruit and blanched veggies… I realized I needed some other ways to deal with the bounty.
So I asked for a food dehydrator. It helped a lot to be able to dehydrate some things and store them in the pantry.
Five Months Ago
I decided to try going gluten/wheat free to see if my allergies cleared up. I went to a few meetups that were about Celiac disease, wheat allergies, and gluten sensitivity. The topic of raw foods came up. Hmmmm…. I wondered about that, so after some investigation, I realized that I already had a perfect tool for preparing some of the more complex raw foods, such as desserts and snacks!
Now
I now use my dehydrator for lots and lots of things. It’s going at least once a week, and usually more frequently. I’ve used it for everything from yogurt to drying my own parsley. The only thing that hasn’t gone in it is animal protein, and that’s never going to happen, at this point!
How I Chose Mine
Because I was originally planning on drying fruits and vegetables, I wanted one that had a lot of drying area and was easy to clean. That meant that I needed to have multiple layers in it. I also figured I would be drying herbs from my garden, eventually, so I wanted one that had the widest possible temperature range. I also wanted it to have a timer, because I didn’t want to get up in the middle of the night, or forget to turn it off when something was going to be finished.
Reliability with a good warranty was a top priority.
My daughter uses hers a lot, so I asked her about it. She gave it high praise… except the one she has didn’t have a timer, and she said that would certainly be useful.
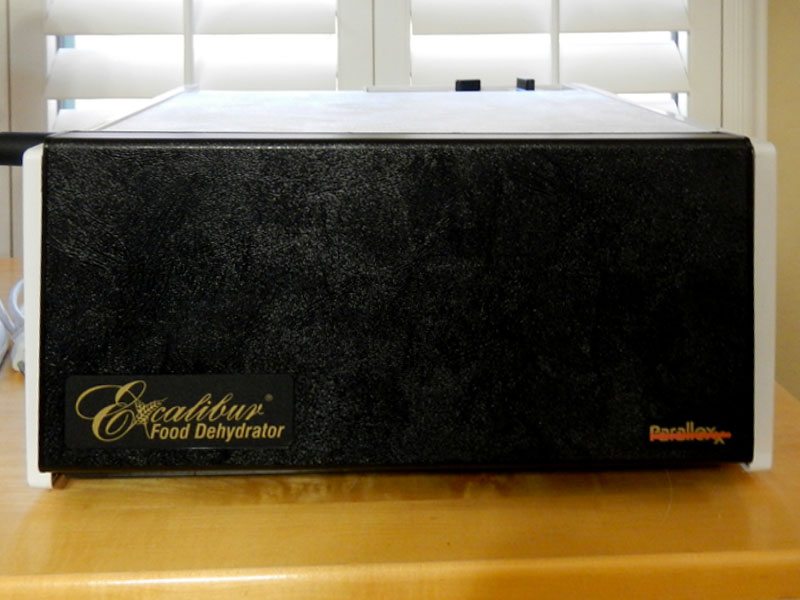
So, after quite a bit of looking around, reading reviews, and investigating various brands, I decided to get almost the same model she has. The only difference is that mine is white and has a timer. I got a 5-tray Excalibur 3526T, with a white exterior. This one included a timer.
Details
5 large trays, 15"x15", 8 sq ft of drying space
26 Hour Timer
Adjustable Thermostat 95◦F to 155◦F
5-inch fan, 440 watts
8-1/2"H x 17"W x 19"D
Shipping Weight: 16 lbs.
Color: Black or White
10 year warranty
Made in USA
I bought it directly from Excalibur. Right now, it is on sale for $249.95. The regular price is $299.99. Those prices do not include shipping.
It looks like this.
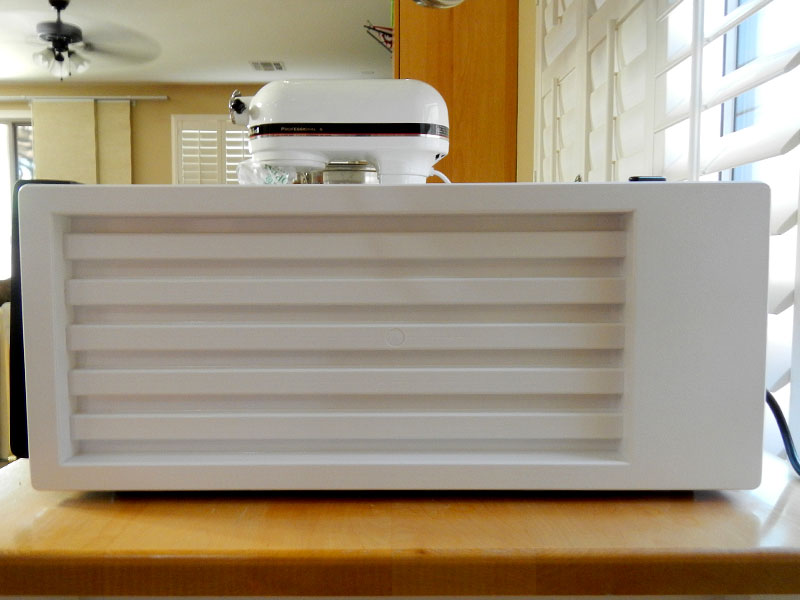
The door is a simple lift-off style. It has a couple of plastic flanges that fit into the groove on the top.
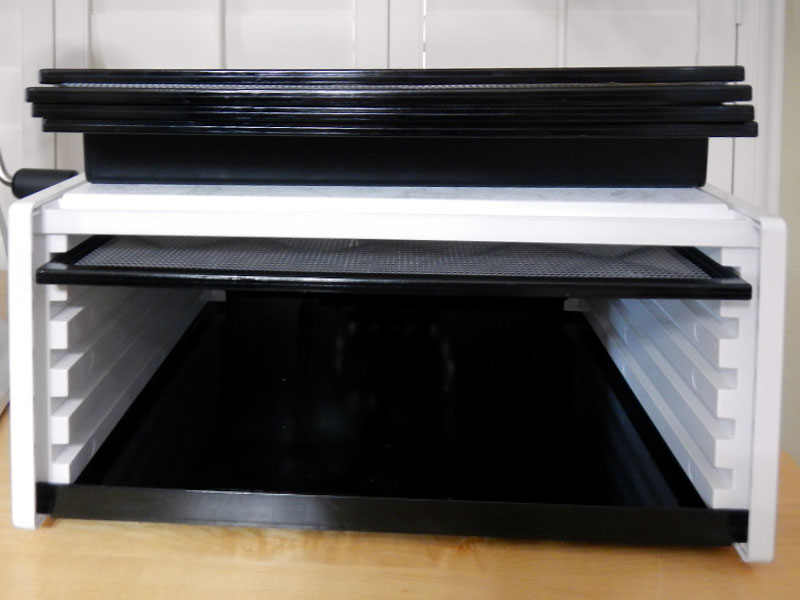
The trays fit into the slots in the interior. They consist of two parts, plus an optional item.
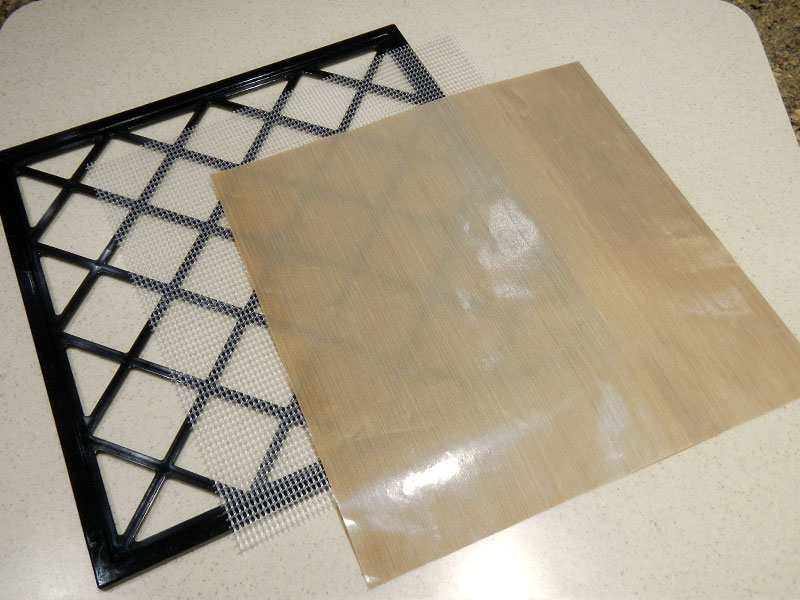
The black base is what fits into the grooves inside the dehydrator. The white plastic mesh piece fits into the inside of the tray. The model I bought came with 5 black plastic trays, 5 white mesh grids and one optional sheet.
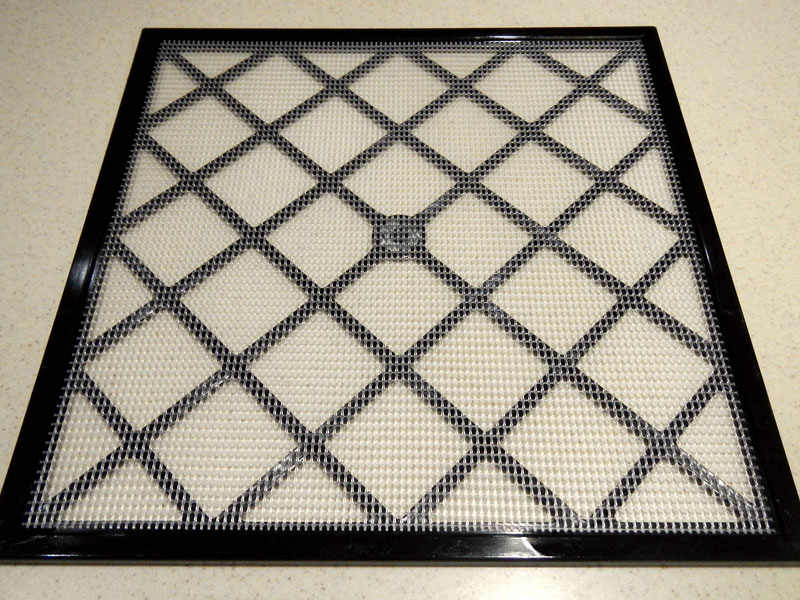
In most cases, this is the configuration you’re going to use to dry your items.
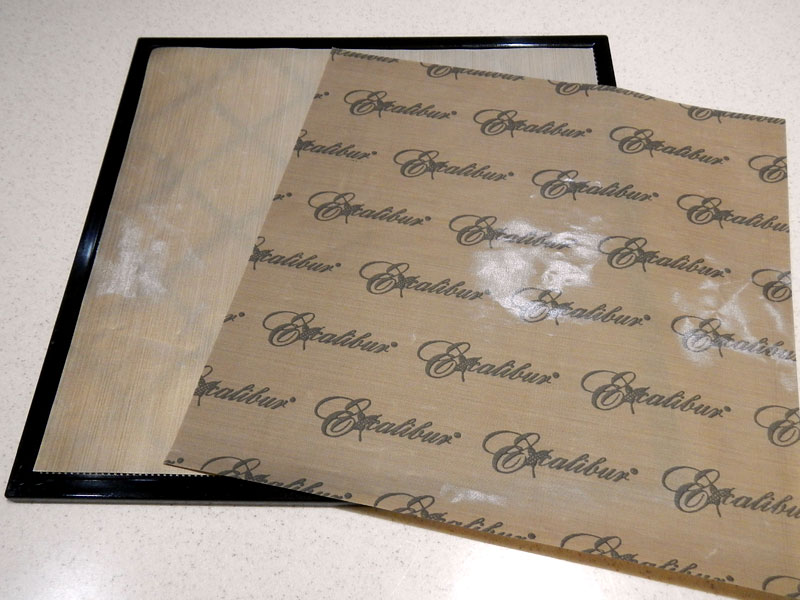
The optional item is a teflon coated paper sheet. One ParaFlexx Sheet comes with the dryer. It is used to dry things like fruit leather, crackers, miso, okara, mashed potatoes… anything with a lot of liquid that you want to dry as a sheet. The sheet is used by placing it on top of the plastic mesh and putting your food on it.
I bought an extra set of teflon coated sheets from Amazon. They were less expensive than the ones sold by Excalibur.
They work just fine, but if they need to be replaced, I will probably get the ones from Excalibur. The ParaFlexx Sheets are a bit heavier and seem to hold up to use better.
The trays and mesh inserts are a snap to clean. I just wash them off with a soapy dish cloth. I have had a few sticky things on them and then I just soak them a minute or two in a sink of soapy water and it came right off.
The teflon coated sheets can not be soaked or submerged in water. They are paper in center. They need to be wiped off with a damp dish cloth. So far, that’s been no problem because nothing sticks to them!
The interior of the unit is plastic. You can just wipe it out with a damp cloth.
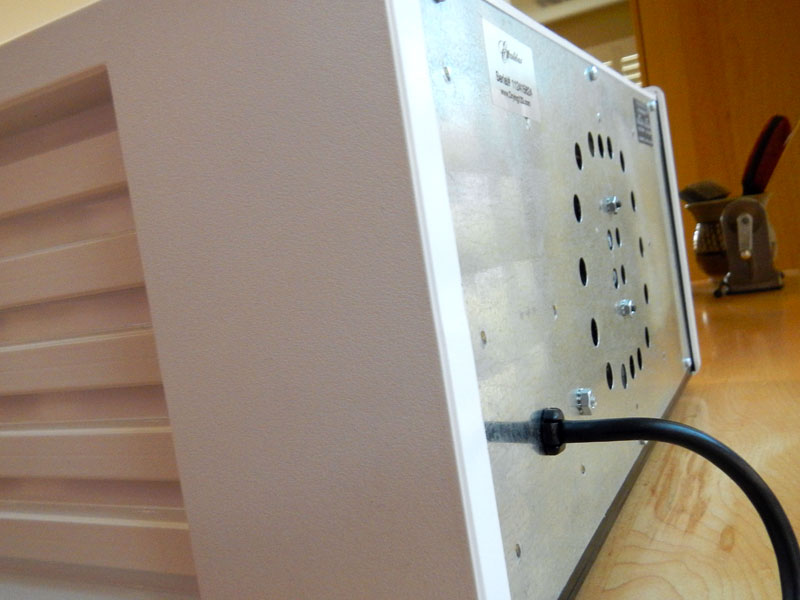
All of the electronics that make it work are mounted on in the back, right, inside of the unit. The fan, thermostat, timer and electronics look like this.
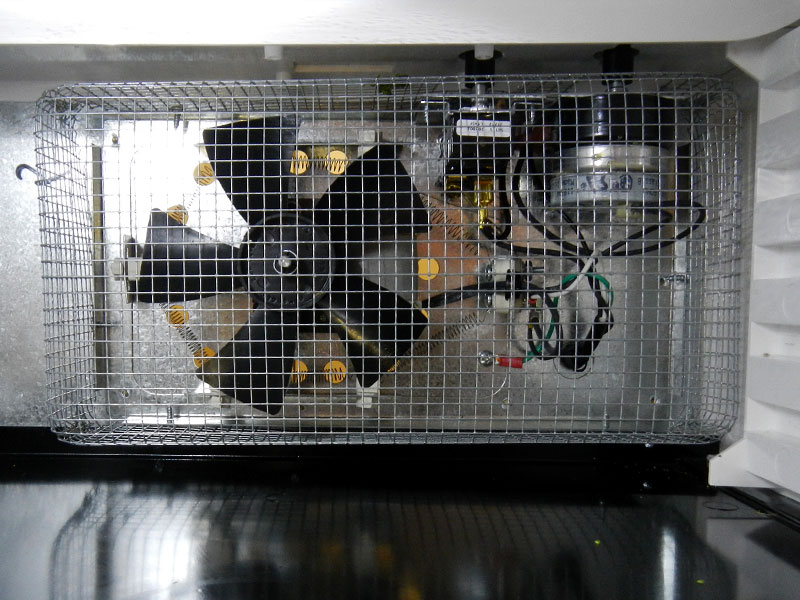
You saw the cord coming out of the back in an earlier picture. Here’s a shot of the control nobs which are on the outside, top, back right.
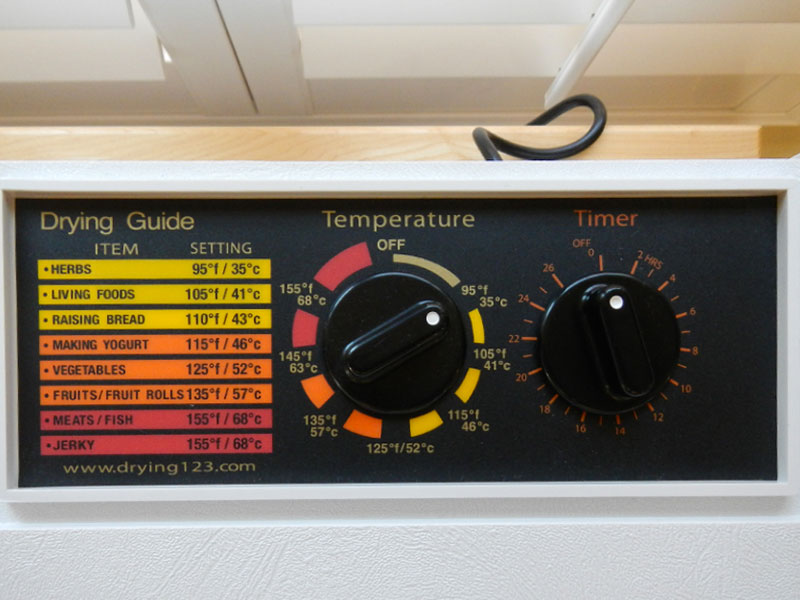
They are simple knobs that are easy to use. Put your trays with food on them in the unit. Put the door on the front. Set the temperature, then turn on the unit by rotating the timer knob, counter clockwise to the amount of time. A thermostat will control the heat, the fan will run and the timer will shut off the unit when it runs out.
The unit does make some noise when it runs. It is about equivalent to running the fan on your range hood at a medium speed. In addition, the unit does put out some heat, so it will warm up the kitchen or the area it it working in. That’s something to keep in mind during the summer (hot) months.
Notes
I recently bought another set of the white mesh grids from the Excalibur website. I discovered that if you dry things like kale chips, parsley or cilantro, they are very light weight at the end and can blow around inside the unit while it’s running. I solved the problem by placing the leaves on the mesh and covering them with a second mesh!
If the items you wish to dry have a lot of height, as in kale chips at first, you won’t be able to fill all five trays with them. There isn’t enough space between the trays. I usually make only 2 or 3 trays of these at a time.
Do not take the door off while the unit is running, especially when light weight things are inside of it! The will blow right out. Instead, turn the timer knob to off, then open the door.
If you get one of these, I strongly recommend you get the Excalibur Preserve It Naturally book at the same time. It has instructions on how to dry almost anything… including things you haven’t thought of yet! In addition, there are lots of recipies and ideas in it. It covers everything from basic drying instructions to raw foodie information.
The reason I chose the white unit, rather than black was because I figured black would be too dark inside to see anything. Well, I didn’t know the bottom would still be black. I do not like it. I have to use a flashlight when I wipe it out. I can’t see stray pieces that fell in there! My first few kale chip experiments ended up with a couple of the dried chips stuck way in the back, under the fan. That freaked me out a bit, having something foreign around the fan and electronics. So, if I had to pick something I did not like about the unit, that would be it!
This thing is fairly big. About the size of a microwave, turned sideways, but not as tall. If you are considering purchasing one, I suggest you find a cardboard box the same size and try it where you think you would put it. At least measure the area you are considering! Keep in mind, you will need to reach the back to set the knobs, and you will have to have an outlet nearby to plug it in. I put mine where it is so that any heat from it would not damage anything above it. Like the kitchen cabinets. It’s on a utility table, beneath my pot rack. there is an outlet on the wall behind it. It’s out of the way, yet at a convenient height and still close to the main kitchen area.
When you are first drying things, you’ll want to make sure you are home. You will want to rotate the trays every couple of hours until you get a feel for how it works. If you live in an area with high humidity, you will want to remove your dried items and store them properly immediately when they are done so they don’t reabsorb humidity from the air.
If you start looking through dehydrator recipes, many of them mention using parchment paper instead of the teflon sheets. Don’t bother. Stuff sticks to them, but more annoying, it’s not heavy enough. It will flap around while the dehydrator is running and displace the food. I tried it, thinking it would be a cheaper alternative. I only did it once!
To make yogurt or raise yeast dough, you just put the bowl directly in the bottom of the unit and turn it on. You can cover it lightly with plastic wrap to keep the item from drying out, you’re just using the unit for heat in this case. But it’s nice that the trays can come completely out for this type of application. Not all the brands I looked at did.
Conclusion
If this broke, it has a 10 year warranty! But if I had to replace it, would I? Oh yeah, you bet… and probably with a 9-tray model. I’ve used it that much. Would I get a different brand? Nope. I like this one just fine. I just wish they made that bottom piece white, LOL!